January 12, 2023


No matter how skilled of a photographer you are, there will always be difficult-to-correct issues that happen to your images. As our technology evolves, we all hope we can save more of our precious shots. We’ve all felt the agony of capturing “the” shot and then realizing it has a major problem. So, what can you do when you run into one of these nearly impossible-to-rescue photos? Our series on difficult-to-correct photos will examine a wide range of issues and suggest techniques and technology to restore more of your images!
Color noise, or chroma noise, in a photo can be extremely difficult to remove.
While you stand a better chance at removing luminance noise (black and white patterns of noise), chroma noise has the unique difficulty of not only plaguing your photo with a noise pattern, but one with lots of color that makes it difficult for your photo editor to strip away without desaturating the color in your image.
Some post-processing software include a chromatic noise slider. More often than not, those editors’ algorithms will simply desaturate the photo overall rather than remove the color only within the noise.
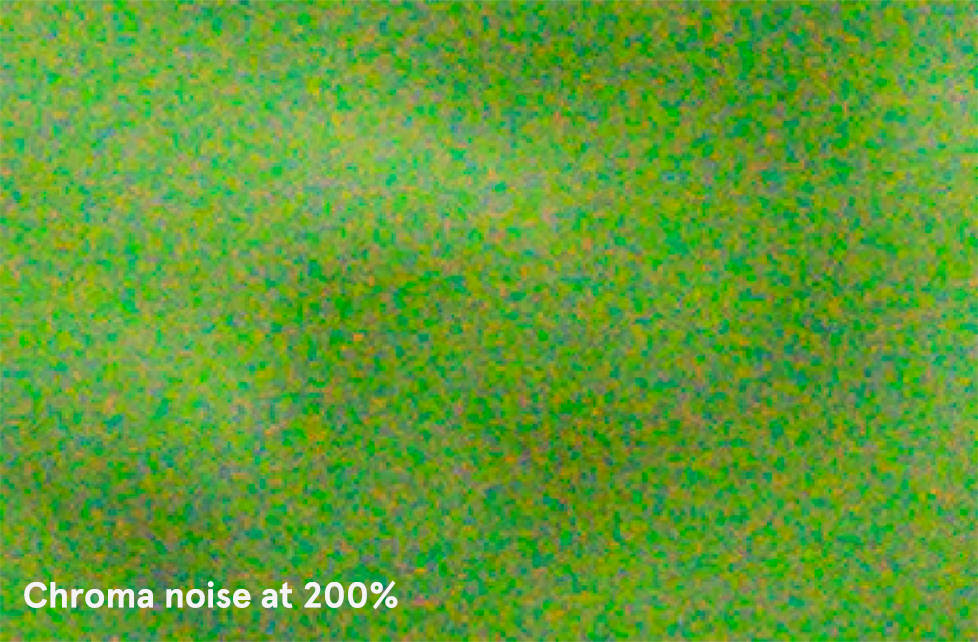
Let’s take this example of a mink captured outdoors in low-lighting with heavy chroma noise.

Editing this image in Photoshop 2020, we only have one noise removal option under “Filters.”
With the color noise slider maxed out, we were able to extract the color from the noise. But, the overall heavy noise pattern still exists. With the highest strength of noise reduction applied, Photoshop was only able to reduce the overall noise pattern by about 30% or 40%.
Photoshop’s technology can handle lots of functions in post-production, but where can you turn when you can’t get the results you want? This is where machine-learning-powered photo editing can really be useful.
Let’s take a look into Topaz DeNoise AI.

We’ve trained a neural network with hundreds of thousands of images on how to distinguish noise, including color noise, from detail. If you want a look into the more nitty-gritty side of exactly how machine learning works in image noise reduction, you can read our article linked.
When you put your image into DeNoise AI it recognizes the color noise pattern and effectively strips it away without reducing the saturation in your photo. DeNoise AI is also trained to remove noise without disturbing any details, including ones that are often mistaken for noise in other editors, like raindrops or stars in the sky. In fact, DeNoise AI can simultaneously sharpen those fine details, saving you even more time.
Let’s give the mink image from earlier another shot but with the technology Topaz DeNoise AI has to offer.

Even though this was a particularly hard image to correct with heavy noise, including color noise, we didn’t have to max out the sliders to get a workable result. DeNoise AI offers a much more advanced and tailored experience to correct your images. Since this image was shot in low-lighting, the Low Light mode is trained to handle this exact problem.
With just a modest amount of chroma noise reduction added with the low-light mode, we get a clear, usable image, with some fine details restored in the mink’s fur. Most notably, there is no desaturation to the image.
Where Photoshop lacked, Topaz DeNoise AI was able to expertly handle a tough noise problem. Topaz DeNoise AI also plugs into Photoshop so you don’t have to disrupt your workflow.
As photographers know, photo-editing technologies have evolved so much that there is very little you can’t do with post-processing. But when it comes to image enlargement, a very common task in editing, technology has not advanced as quickly as most photographers would hope.
Particularly around the holidays, we like to reminisce over those old family photos and enlarge those photos into prints as gifts for other family members. It can be so very difficult, if not nearly impossible sometimes, to create a high-quality print from an old photograph that’s been scanned. The older the photograph, the more issues you’re going to run into due to the limited color palettes, soft focuses, and small sizes.
Let’s take a photograph from the 1920s for example. Raquel Bigby provided us with this beautiful portrait of her grandmother, Claire Windsor, a silent film star of Hollywood's golden era.
The original scanned size is just 706 x 960 pixels.

“My grandmother, Claire Windsor, was a silent movie star. I've been painting a portrait of her using this photo as a reference. She inspired me in the arts, painting and photography. I have hundreds of old photos from the 1920s - 1940s that Topaz Gigapixel AI has allowed me to beautifully restore and bring back to their intended glamor and glory.” - Raquel Bigby
Until recently, your best chance at increasing the size of an image was through Photoshop. You enter in your desired dimensions, within reason, because you know there are serious limitations. You don’t want to end up with a pixelated, stained-glass version of your image, but you know if you want a significant size increase, that will ultimately be the outcome.

To get a decent print, we want to aim for about 4x the original size. Photoshop has three resampling technologies: nearest neighbor, bilinear, and bicubic.
Nearest neighbor interpolation is one of the simplest upscaling technologies in resampling images.
In nearest-neighbor interpolation, the nearest neighboring pixel is determined, and the intensity value of such pixel is assigned to the unknown coordinate, i.e., assigning the value of the nearest data point to an unknown point.
Since the value of several unknown coordinates is usually estimated when using this algorithm, the output image it delivers usually contains noticeable squares or chunky blocks of pixels. This algorithm generates unimpressive, lower quality, jagged images, since many values are assigned the same value.

Where Photoshop fails, Topaz Gigapixel AI's neural network can detect text and letters and restore them the way they were intended.
This option usually produces better quality images than the nearest-neighbor algorithm. As with all interpolation models, the bilinear interpolation algorithm calculates the values of a grid location by using the four closest cell centers to assign values.
A weighted average of the features of the four nearby grid cells is calculated and assigned to the output cells. Bilinear interpolation is carried out by interpolating in two linear directions, i.e., both vertically and horizontally.
Photoshop's bilinear result is an improvement over the nearest-neighbor algorithm, but the image is still desperately stretched, resulting in a very high loss of quality.
Bicubic interpolation is an improvement on both bilinear interpolation and nearest-neighbor. The bicubic interpolated surface is a little smoother than what is obtained by the other two interpolations. Bicubic interpolation uses interpolation on a standard 2D grid of pixels and samples 16 pixels at one time.
Even though bicubic interpolation produces somewhat better results, it does not produce any new details and the results usually appear blurry since the algorithm attempts to find a balance between smoothing and pixelated artifacts.
As you can see from the algorithms above, when you enlarge a raster image, there is no new information added to the image so you can’t add any additional quality. But you can do the impossible with machine-learning-powered image enlargement, like Topaz Gigapixel AI.
Gigapixel AI recovers real detail in your image. Gigapixel AI is currently the only photo enlargement product available that can actually add detail back to your upscaled photo.
This is only possible through machine learning. Gigapixel AI’s neural network is trained with millions of images, so it learns features of objects, people, animals, and more.
Visit our product pages for DeNoise AI and Gigapixel AI and click on the "Try for Free" button to download free trials that never expire.

© 2005 - 2024 Topaz Labs. All rights reserved.