August 10, 2022


One of the most common questions submitted through our Topic Submissions Form is "How can I easily reduce noise in my photos?" This is a great question and is worth analyzing in greater detail. Noise in a photo has primarily become a byproduct that photographers have learned to associate as a negative and with good reason. While it's essential to know how to reduce noise in your photos, it's equally necessary to understand what noise is.I'm going to break up this article into the following sections, and by the end of it, you'll have a clear understanding of:


There is no shortage of articles that go into painstaking detail to explain the technical reasons why noise exists within your photos. But, I assume that you're more interested in learning how to reduce noise in your photos quickly, so I will give you a summary of the types of noise and what causes it. I recommend reading this article to learn even more about what causes noise in your photos.Several factors and variables determine how much noise will appear in your photos, and we'll discuss those shortly. To summarize, photographing in low light conditions while using high ISO values will often lead to noise. Other factors to consider, such as sensor size and quality, also play a role in noise production.The important point is that noise is an all-too-common reality with even the most expensive cameras, so don't beat yourself up if you see it present in your photos. The good news is that it's easier than ever to get rid of that noise without sacrificing critical details, which is an excellent segue to the next section.
One of the most common words used to describe noise in photos is "distracting." Much like aberrant dust spots, the presence of noise can distract a viewer from fully appreciating the nuance and detail of your composition. You likely went to great lengths to capture the photo you're preparing to share, and it's reasonable to expect that you'd want to get rid of all distractions, right? Let’s use the following image as an example. Do you see how distracting the noise is, especially when you compare it to the version that was processed with DeNoise AI?


But, here's the rub: not all noise reduction methods are created equal. In many cases, noise reduction tools may do a fine job addressing the primary issue, but it comes at the cost of detail loss. If you've ever looked at a photo and thought, "that looks very plasticky," you're likely looking at the result of subpar noise reduction that doesn't factor in edge detail retention.It is simply not practical to apply noise reduction to your photos at the expense of losing detail, which is why it's critical to use the most effective solution available. As you can guess, we believe that DeNoise AI is the best solution because it leverages years of deep learning to provide stellar noise reduction while retaining—and enhancing—fine details.
Two primary types of noise can manifest themselves in your photos, and it's essential to know how to address each one. The two types of noise are Luminance noise and Color—or Chromatic—noise. It's important to reiterate that the presence of either type of noise in your photos is not an indicator that your camera lacks quality or is defective. Noise is a reality that almost every photographer alive has had to address within their editing workflows.
Luminance Noise
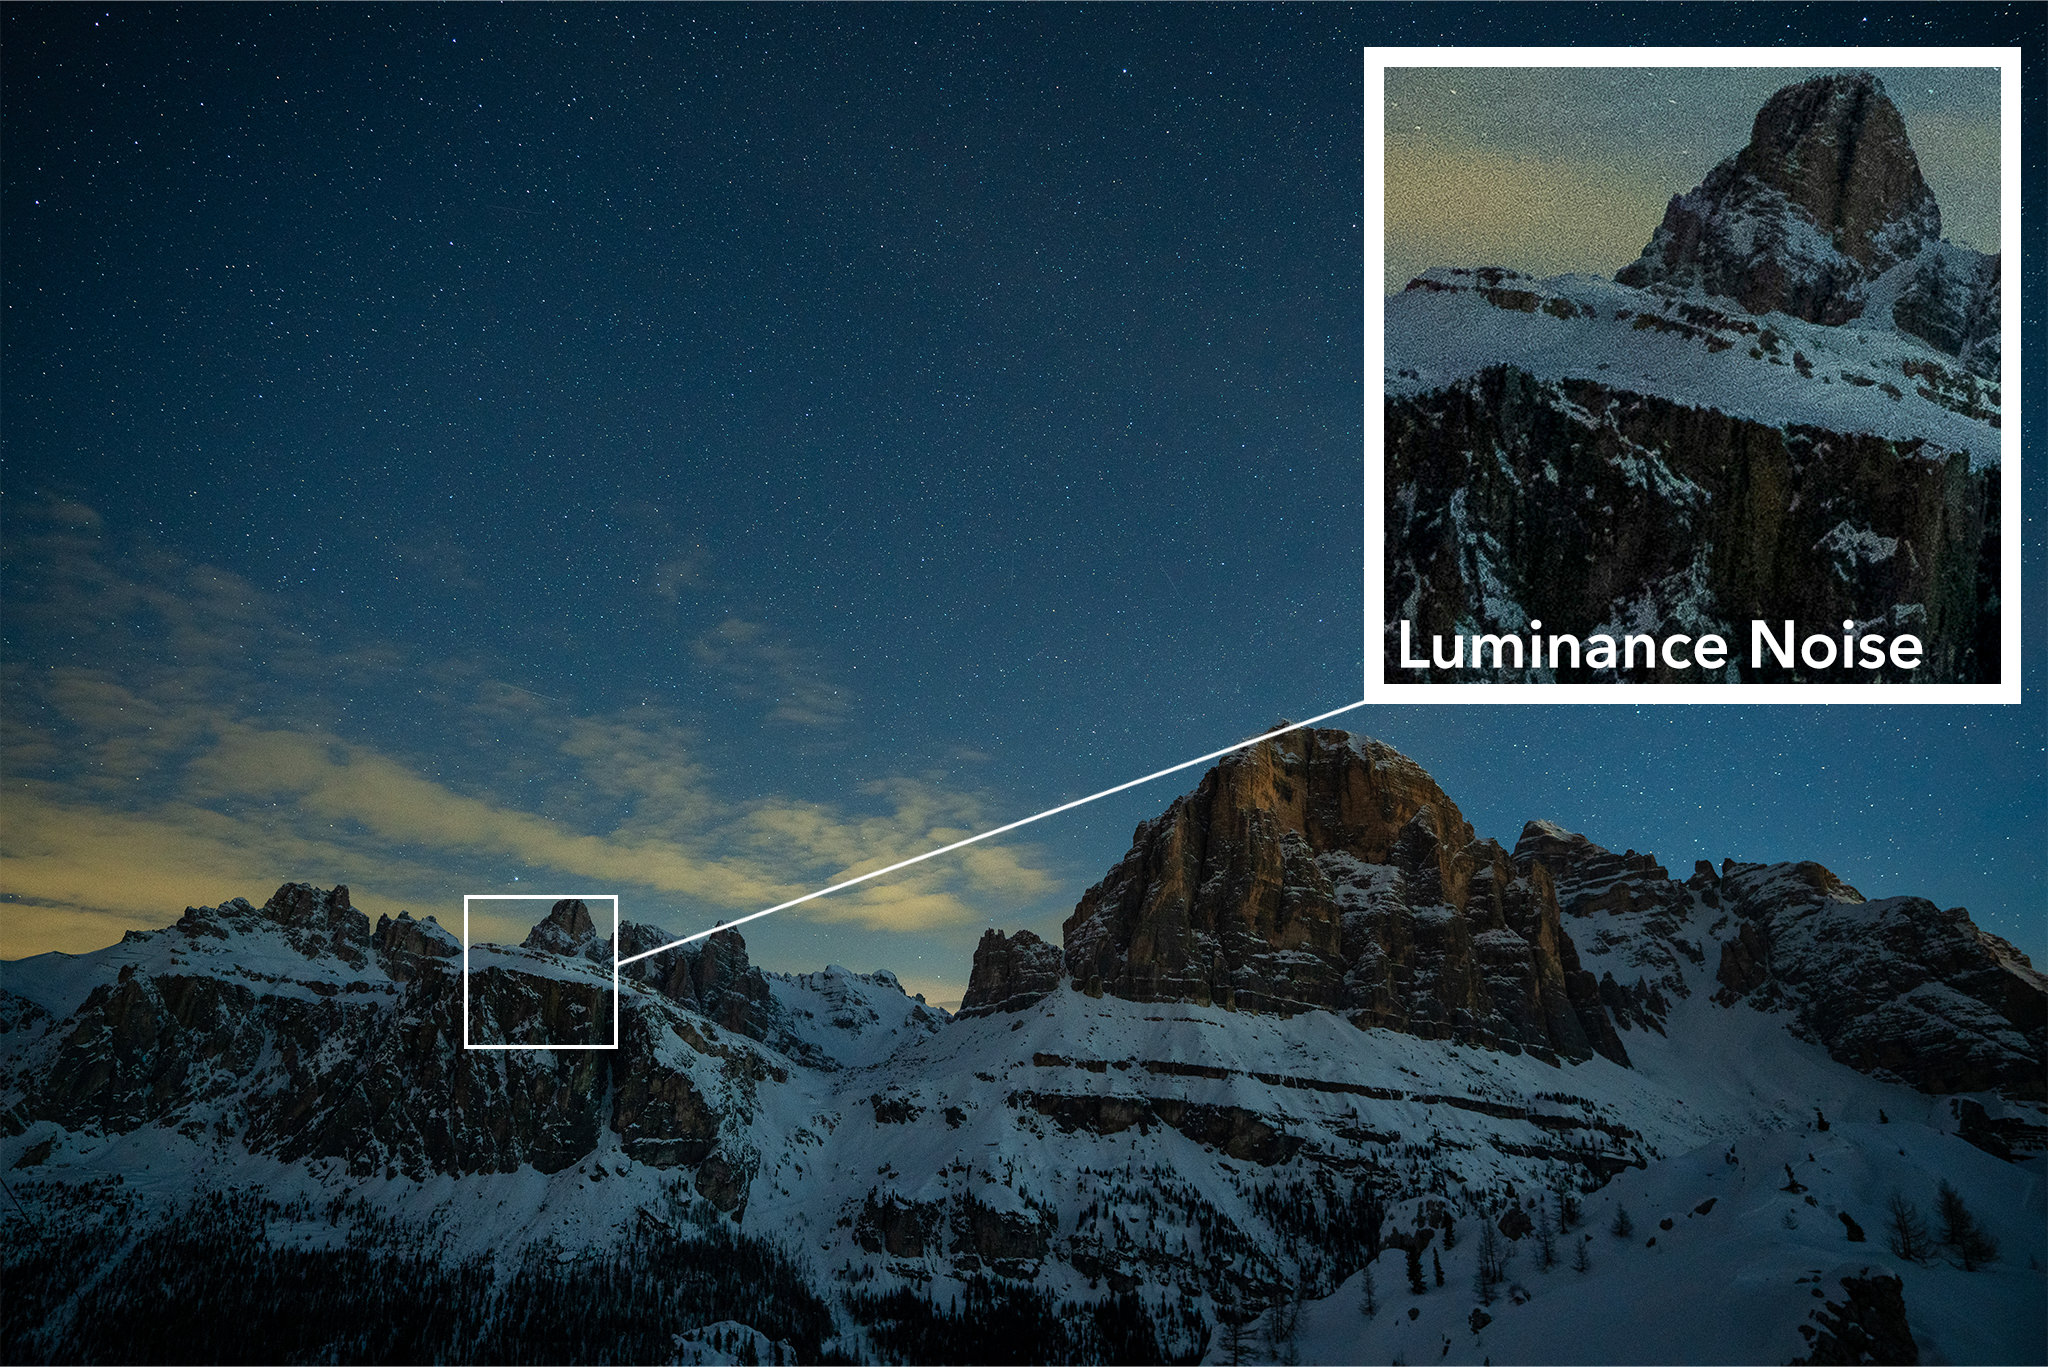
Luminance noise most closely resembles the grain you'd see in film photos. It's colorless in its presentation, and several factors determine where it will appear. Luminance noise generally manifests itself as darker grain in the highlights and lighter grain in the shadows. Using high ISO values is one of the most common factors leading to the presence of luminance noise. We'll discuss that in the next section.
Color Noise

Color noise is what it sounds like: noise that differs in color from surrounding pixels and is arguably more distracting than luminance noise because it doesn't blend in as easily. Color noise is primarily visible in under-exposed photos shot at high ISO values. Desaturating these colored pixels is a common way to mitigate this type of noise.
The combination of your camera sensor, lighting conditions, and exposure settings largely determine both the presence and type of noise. Larger sensors capable of capturing a greater dynamic range tend to perform better than smaller sensors when mitigating noise. However, even larger digital medium format sensors are subject to noise under specific conditions.The amount of available light also plays a role in determining the presence of noise. It is imperative to use proper exposure settings when photographing in low light conditions. If you don't correctly set your exposure values, the camera will have to fill in that information, often where the noise is most visible.

Finally, it is common for photographers to increase the camera's ISO setting when photographing in low light conditions. The camera sensor becomes more sensitive to light as you increase the ISO setting and will heat up longer you set your exposure's shutter speed. There is a direct correlation between the increase in light sensitivity, the sensor heat generated from long exposures, and an increase in noise.
Fortunately, there are many things you can do in the field to minimize the amount of noise generated by your camera sensor. Using the lowest possible ISO setting while ensuring a sharp photo is advised to reduce noise. Using a stable tripod to support your camera during long exposures will do wonders to reduce motion blur while letting you select a lower ISO setting, but you may need to use a longer shutter speed to allow the necessary amount of light in. Using a fast lens with a wide aperture will help reduce the shutter speed required to get proper exposure. Your camera sensor will begin to heat up the longer you set your exposure, resulting in more noise. But, you can achieve proper exposure with a shorter shutter speed when you use a fast lens.Using a wide aperture will result in a shallow plane of focus, so many photographers opt to use focus stacking techniques to blend multiple photos taken at different focus points to simulate a deeper plane of focus.
Finally, I highly recommend setting your camera to shoot in RAW (and in Uncompressed mode if available). RAW files record pixel data directly from the camera sensor and provide greater flexibility to manage tonal information, especially when compared to the JPEG format. You want access to as much sensor data as possible when editing your photos—including reducing noise—and the only way to take advantage of that is by shooting in RAW.
Now that you have a better idea of what digital noise is, how it's created, and what you can do to prevent it, we need to discuss what you can do to reduce it during post-processing. As discussed, noise can manifest itself even when you take every precaution into account. We know that noise can be a distraction that must be dealt with, but not at the expense of losing edge detail.
Fortunately, we built DeNoise AI to intelligently differentiate between removing distracting noise and preserving critical edge details. We've spent years training our AI models to address multiple common scenarios where noise is most prevalent. I highly recommend this article by Partha Acharjee, one of our lead R&D scientists, to learn more about how we train our AI models to provide best-in-class intelligent noise reduction.
I also recorded this Photo Workflow & Editing video to show you how I use Adobe Lightroom Classic and DeNoise AI to apply a base edit and reduce noise in my photo.
Visit our product page for DeNoise AI and click on the "Try for Free" button to download free trials that never expire.

© 2005 - 2024 Topaz Labs. All rights reserved.